
For several years, I’ve been using the Cactus V5 wireless flash transceivers (or radio triggers, as they’re often called) for strobist photography. They are relatively low-cost and very reliable full-manual triggers that can trigger virtually any flash gun from just about any camera. Over the years I’ve gathered several different brands and types of flashes: two different Canon EX models (that support E-TTL II), two different Canon EZ models (from the analogue era, so no TTL on digital bodies), a Sigma EF (for Canon) and a Nikon SB-28 – whatever I could pick up for cheap second hand. So the V5’s versatility was very handy. They have some minor downsides (they don’t have a power save function, can be difficult to remove from a camera hot shoe, and it’s hard to see which channel is selected in dim circumstances), but they get the job done very well.
The downside with manual triggers of course is that one has to adjust all flash settings on the flashes themselves. That can be pretty cumbersome, especially when putting flashes inside softboxes or in hard-to-reach places. I thought of switching to E-TTL flashes or some other means to control the flash settings remotely, but was put off by the cost of the potential solutions I found. That’s when I heard that Cactus was developing a system that could potentially control the power settings of all the flash guns I owned, at a price that I could afford.
That system is the Cactus Wireless Flash Transceiver V6, or “V6” for short. The only thing that the flashes I own have in common is that they all support some form of TTL, but across different brands. The V6 promises to be able to control these flashes and to remotely set their power levels as well. Simultaneously. In different groups. With other cool features like TTL pass-through. Let’s test that out!
NB: this review is based on pre-production units — the hardware is final, but the firmware may change a little before the V6 hits the shops.
NB: I’ve been part of the beta test team for the V6, but am not paid by Cactus and in no way affiliated with them.
Features & Specifications
Headline features:
- Wireless manual power control of a list of current and previous Canon, Nikon, and Pentax flashes.
- Flash profile learning for analogue-TTL flashes.
- Full manipulation of power levels to 1/10, 1/3, 1/2 and 1EV steps.
- Lo Power mode fires the flash for extremely short lengths of time.
- Absolute Power Mode benchmarks the power output of different flash models to the same light intensity.
- TTL pass-through with Canon, Nikon, Olympus, Panasonic, Pentax, and Fujifilm via one single unit.
- Built-in optical trigger enables pre-flash triggering.
- Group control allows you to control up to four groups.
- Relay mode triggers the camera shutter and flash in sync.
- Delay timer is configurable from 1 millisecond to 10 seconds.
- Mini-USB port for optional power supply and firmware updates.
Technical specifications, from the manual:
- Working radio frequency: 2.4 GHz
- Number of channels: 16
- Number of groups: 4
- Support sync speed up to 1/1,000 second (subject to camera’s sync speed limitation)
- Maximum effective distance: 100 meters
- Operating temperature: -20°C to +50°C
- Camera voltage handling: up to 6V
- Flash voltage handling: up to 300V
- Dimensions: 72mm (L) x 72mm (W) x 42 mm (H)
- Weight: 68g
- Power input: Two AA batteries; mini USB 2.0, DC input 5V, 500mA~1A
- Estimated battery life (with 1000mAh batteries):
Battery life
TX RX LCD Backlight Off 40 hours 21 hours LCD Backlight On 25 hours 17 hours
Unboxing & First Impressions

The matte cardboard box looks nice, with very distinct Cactus styling. It’s all cardboard, so Cactus have given some thought to the environment. In the box are an 80-page user manual, an inspirational booklet with photos taken by users of the V5, a flash stand and the V6 itself. The flash stand is very sturdy, much better than the rather flimsy one that came with the V5. It lacks a thread for a lightstand. No batteries or adapter cables are supplied – I still have the cables that came with the V5, so that’s not a problem.
The first impression I get upon taking the V6 itself out of the box is that it’s quite big; it’s about as high and deep as the V5, but about 2cm wider. On-camera or under-flash this isn’t a problem, but they do take up a bit of space in the camera bag. They feel quite sturdy, especially with batteries in them. Not 580EXII-sturdy, but better than the V5, and I’ve never had any problems with the toughness of those. The square-ish, industrial-looking design looks nice and the controls appear to be well laid-out.
Overview
Some views of the V6.
Let’s go over the external controls and features.


 |
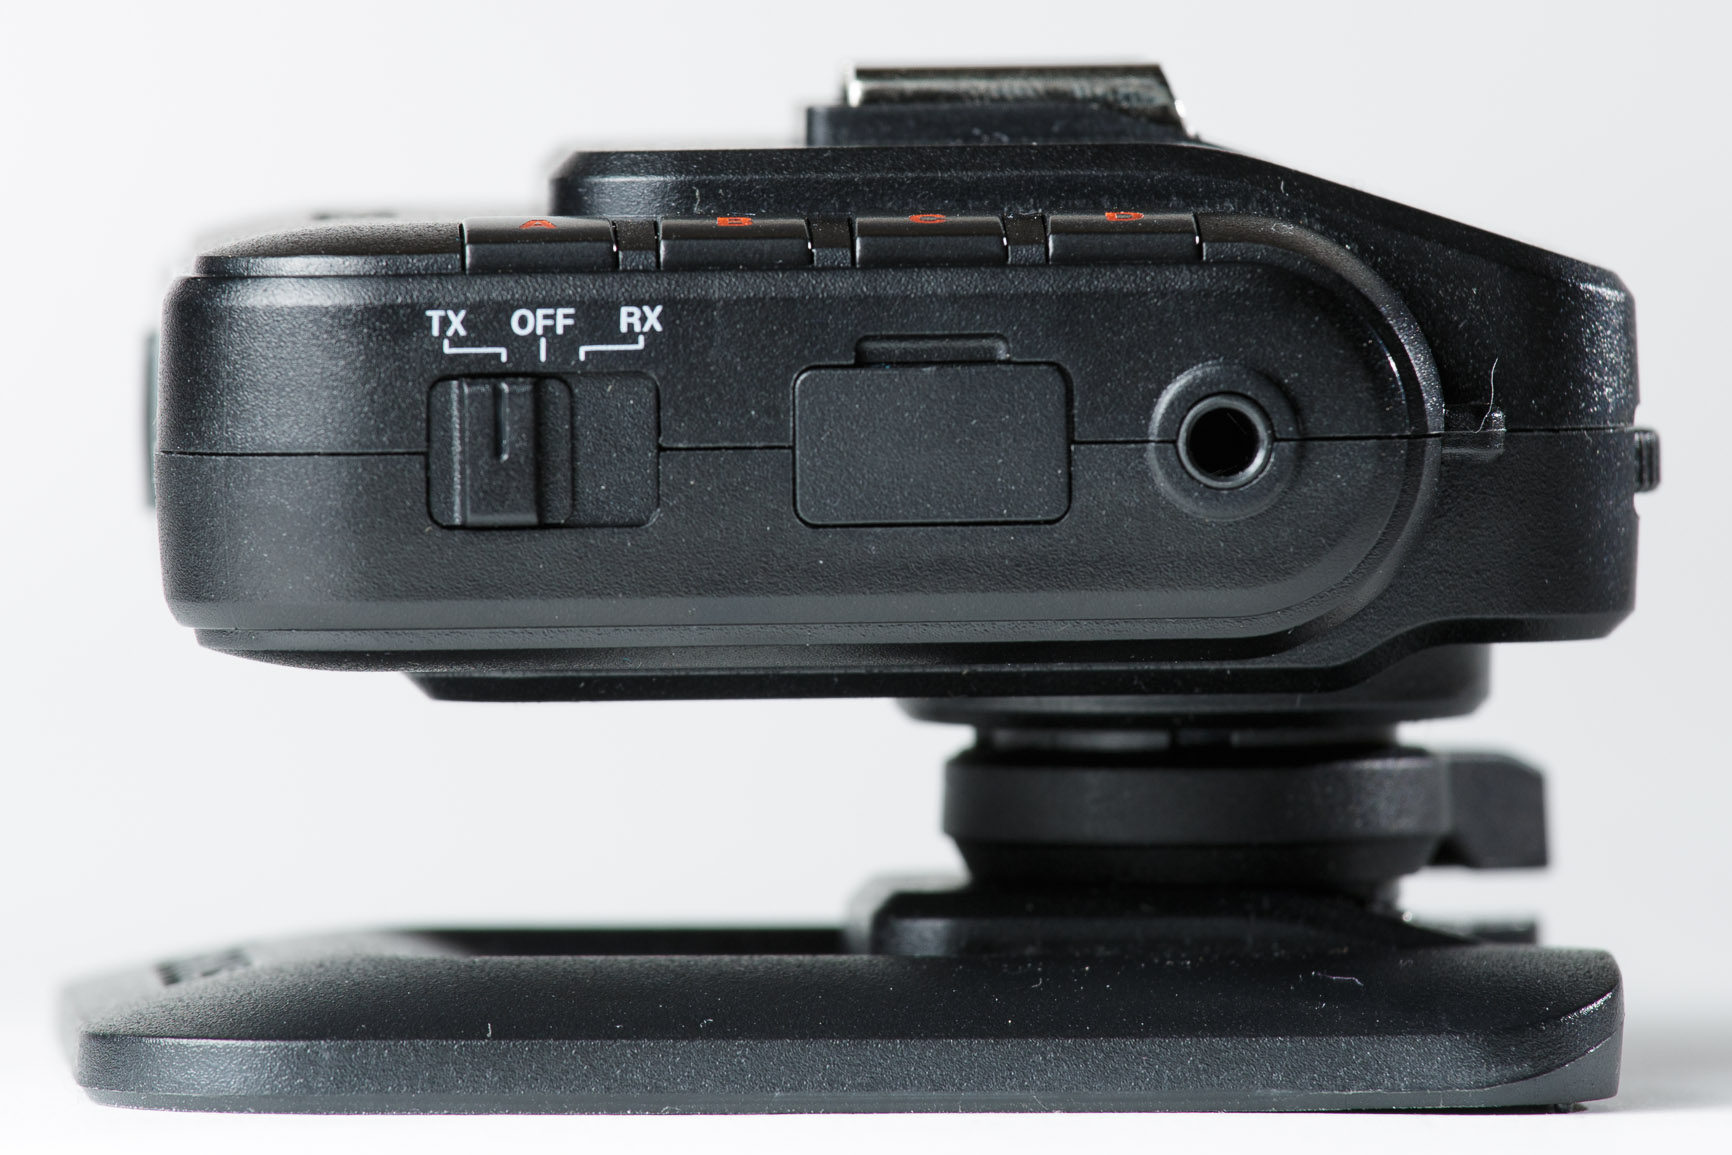
Mode switchThe V6 is a transceiver that can be used as both a transmitter and a receiver. The mode switch selects the mode (“TX” for transmitter, “RX” for receiver”) and powers on the transceiver. It’s tighter and easier to use than the V5’s. |
 |
Mini USB portThe USB port allows for firmware updates – new firmware can contain bug fixes, new features and new flash profiles provided by Cactus. The port can also be used to power the V6 without batteries. Since I have a few USB phone chargers lying around, this may be a convenient feature in a studio setup. X-sync portThis 3.5mm jack plug allows the V6 to be triggered externally (e.g. via a PC cable) in TX mode, and to trigger cameras or flashes externally in both TX and RX mode. A cable is not provided, but you probably already have one lying around already. It allows the V6 to be used as a wireless shutter release. |
 |
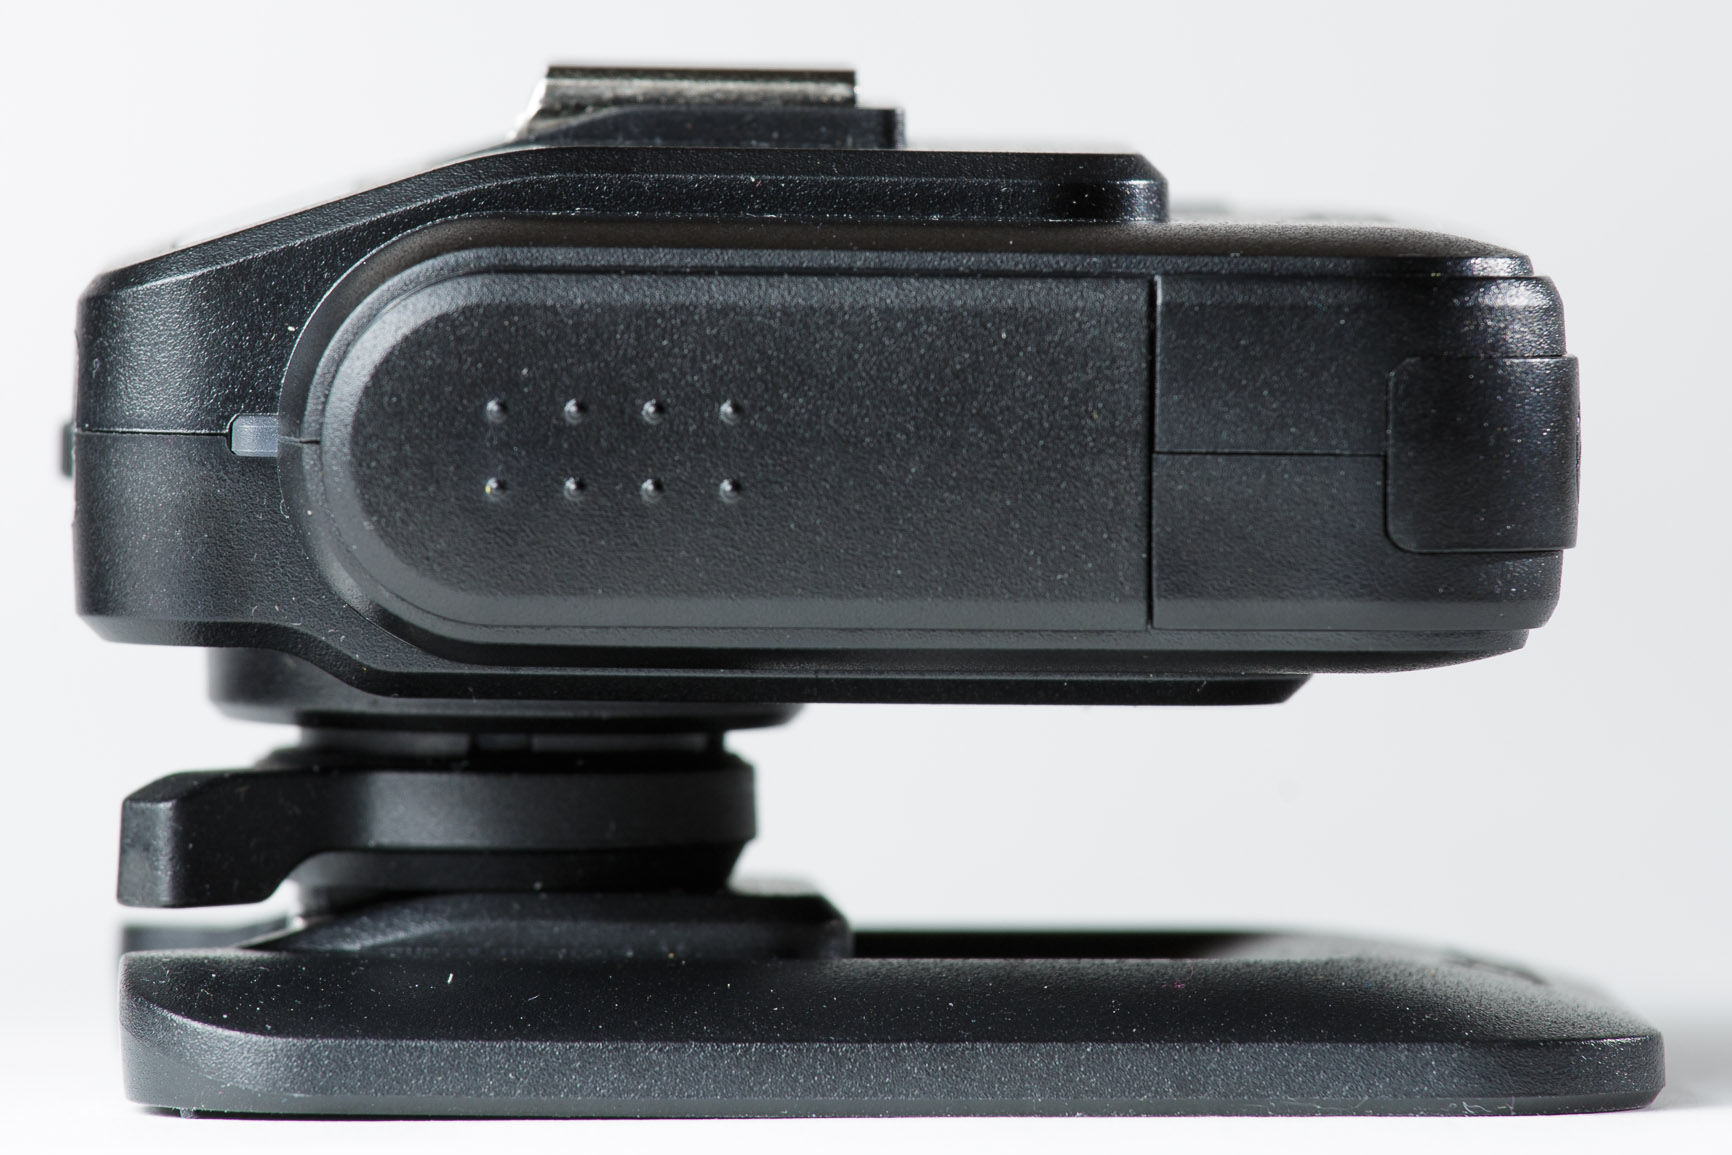
Battery compartmentThe V6 is powered by two AA batteries. Coming from the V5, which is powered by AAAs, this was a slight inconvenience for me. Now I have to use batteries I normally put in my flashes for my triggers as well. The upside of (and reason for) using AAs is a longer battery life. It can be a bit finicky to close the compartment door at first, but it is easy to open when you need it to and locks securely otherwise. |
 |
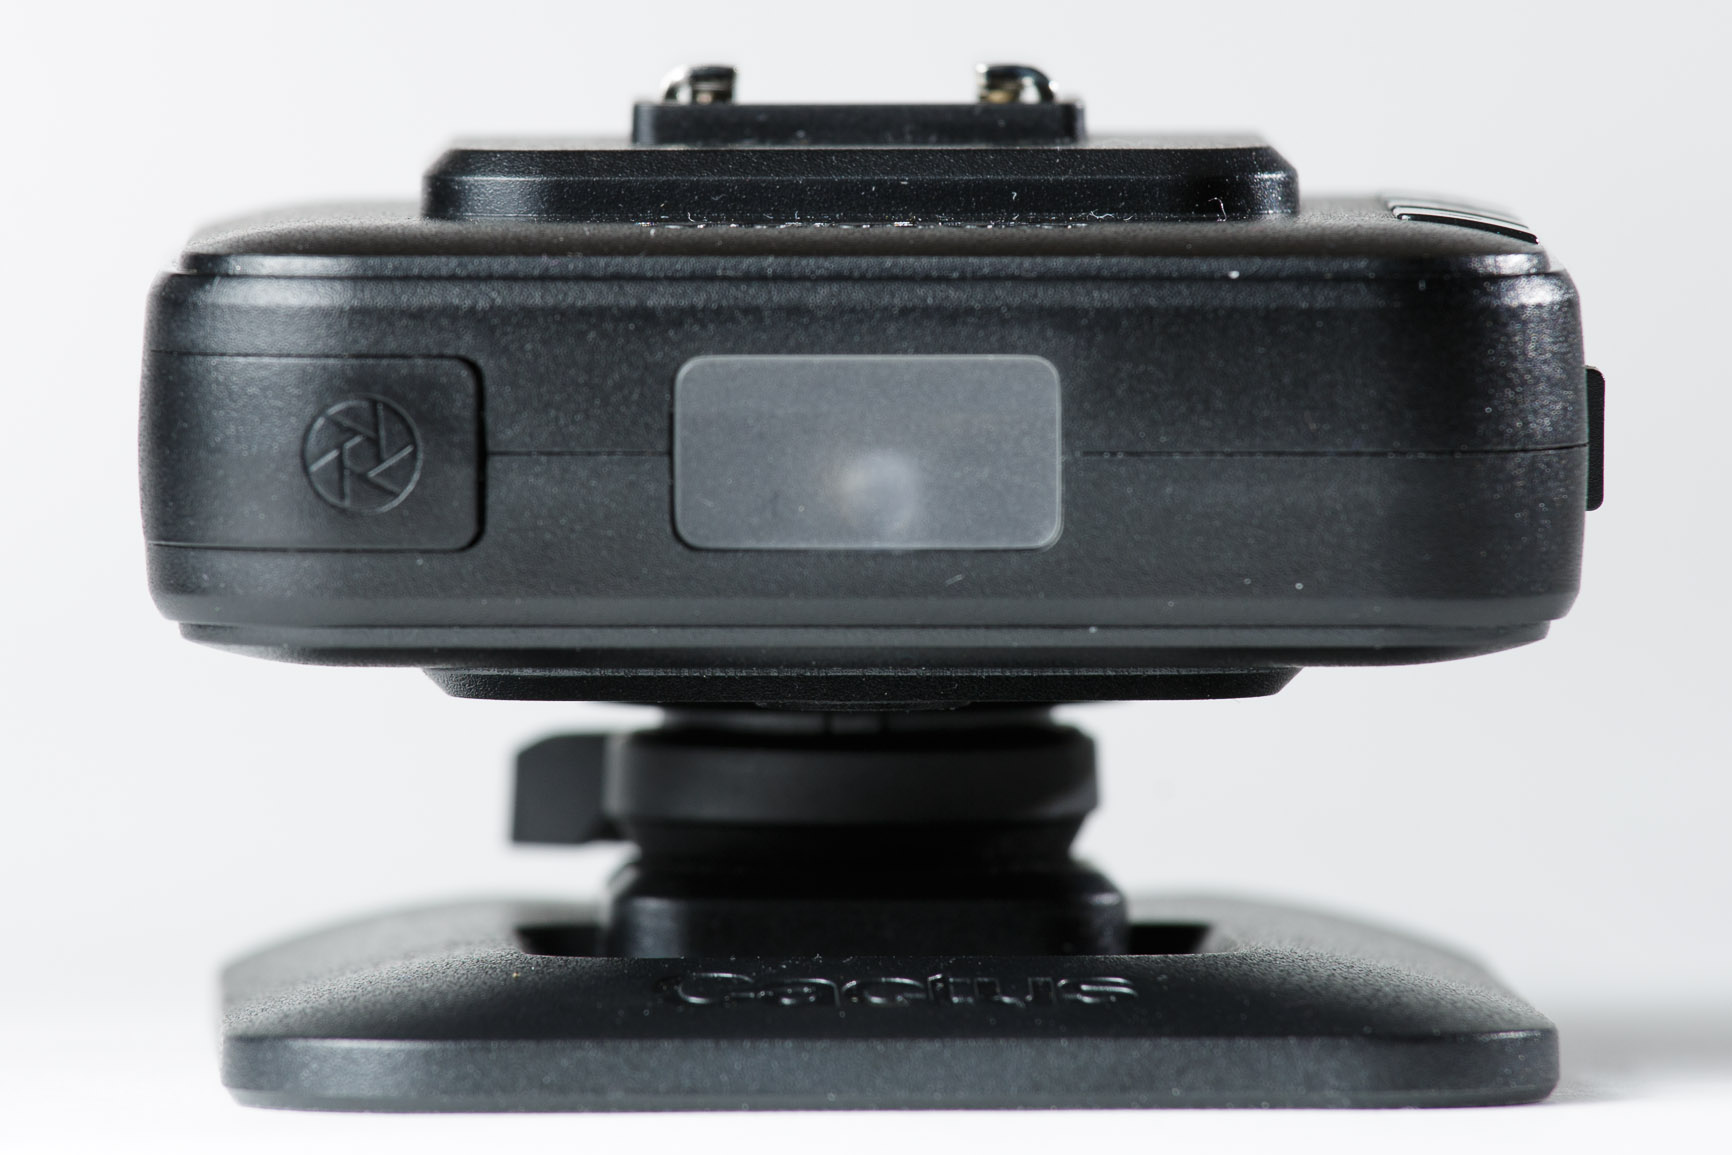
Test/shutter release buttonThis button can be used to test fire the flash on the V6, both in TX and RX modes. In TX mode, it also triggers all receivers. When used as a wireless shutter release, it functions as the shutter release button. Half-press for focus, full-press for shutter release. Optical sensorThis sensor allows the V6 to be used as an optical trigger (useful for HSS flash). It also allows the V6 to measure a flash’s output during profile learning. |
 |
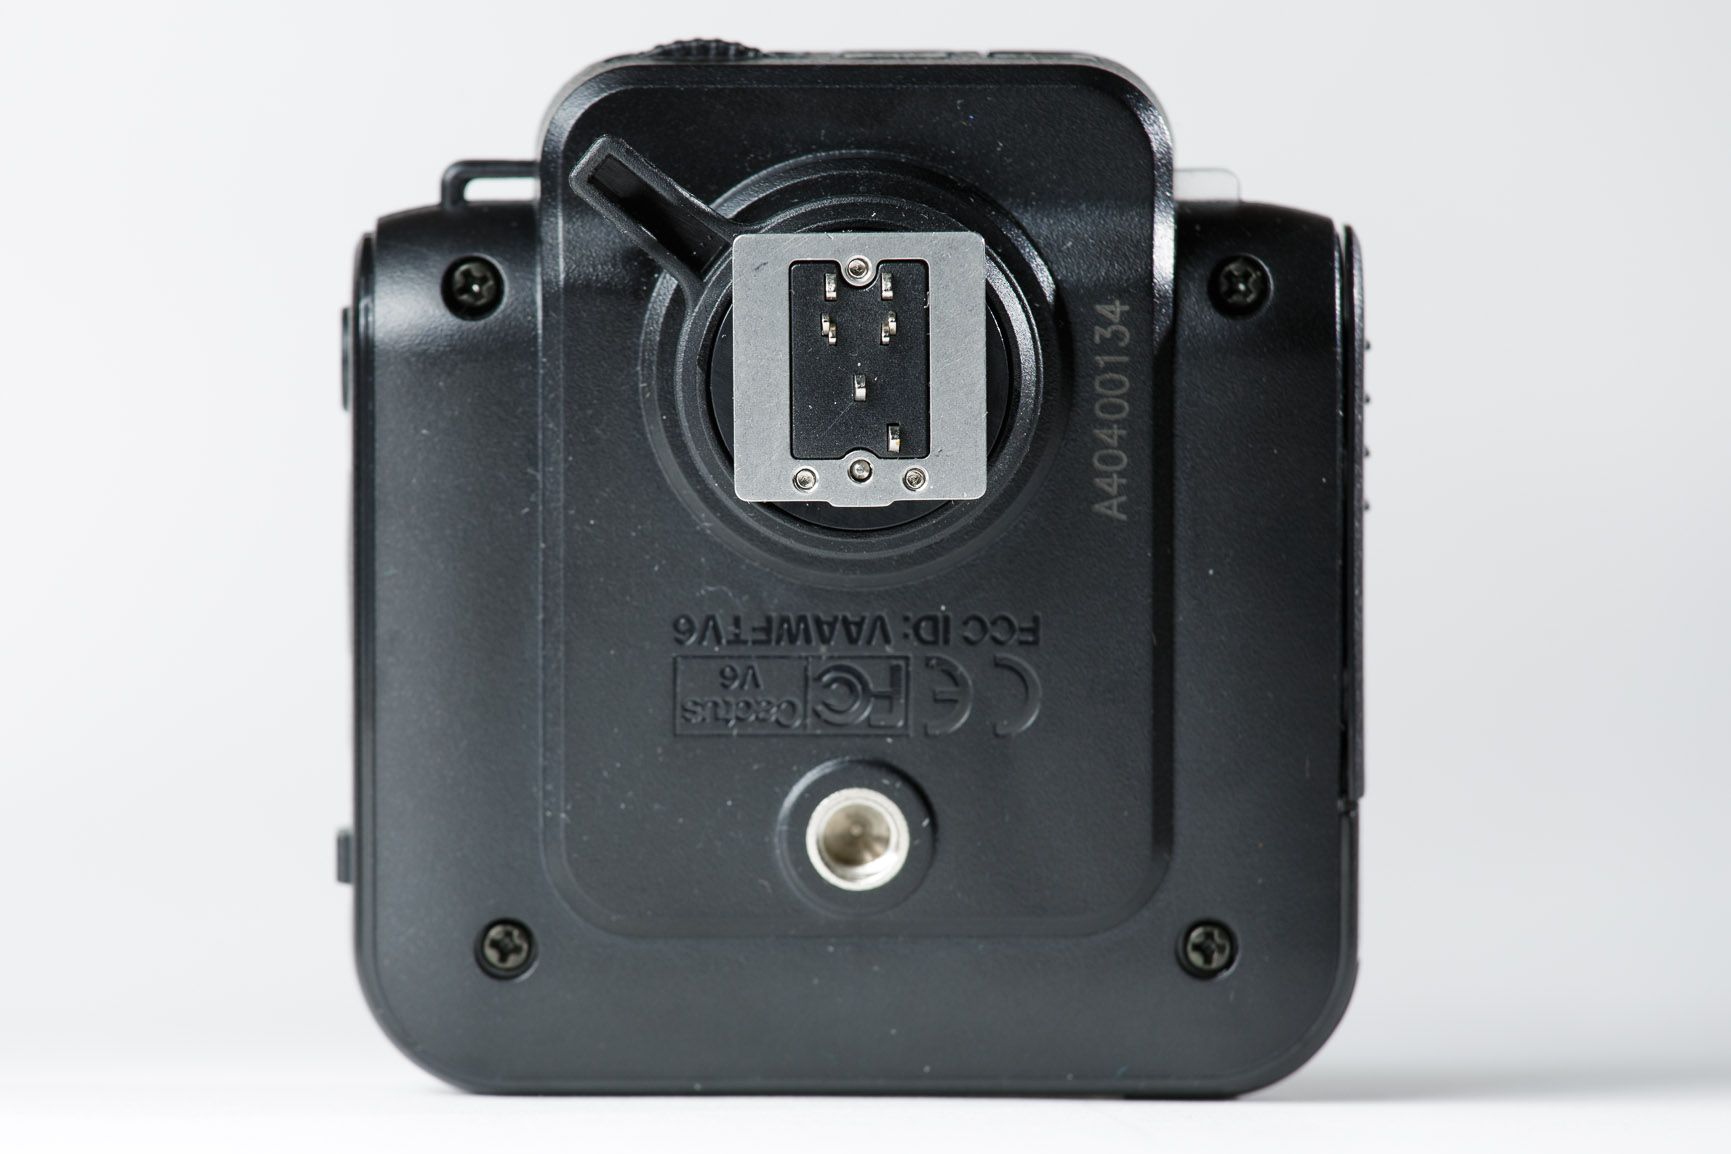
“Multi-system” hot shoeThe hot shoes on the top and bottom of the V6 both have contact pins to allow the V6 to be used on all those different camera and flash systems. The male shoe has a locking pin and the female shoe has a locking hole for secure fastening, which the V5 didn’t have (until December 2013). A welcome addition, since I’ve had a flash that relied too much on its locking pin fall off a V5 once. |
  |
Locking leverAlthough the V6 is wider than the V5, it’s much easier to mount on a hot shoe because it has a locking lever rather than a locking wheel. This is a welcome change, since I’ve had some trouble removing my V5s from my camera from time to time. Tripod mountThe tripod mount allows the V6 to be screwed directly onto flash stands and tripods. A problem I had with the V5 was that the mount was placed so close to the hot shoe that it couldn’t be mounted to some flash stands and most camera tripods with a base plate. You’ll have no problem mounting the V6 to a light stand, but most tripods are still out of the question. A tripod mount in the supplied flash stand could have prevented this. |
 |
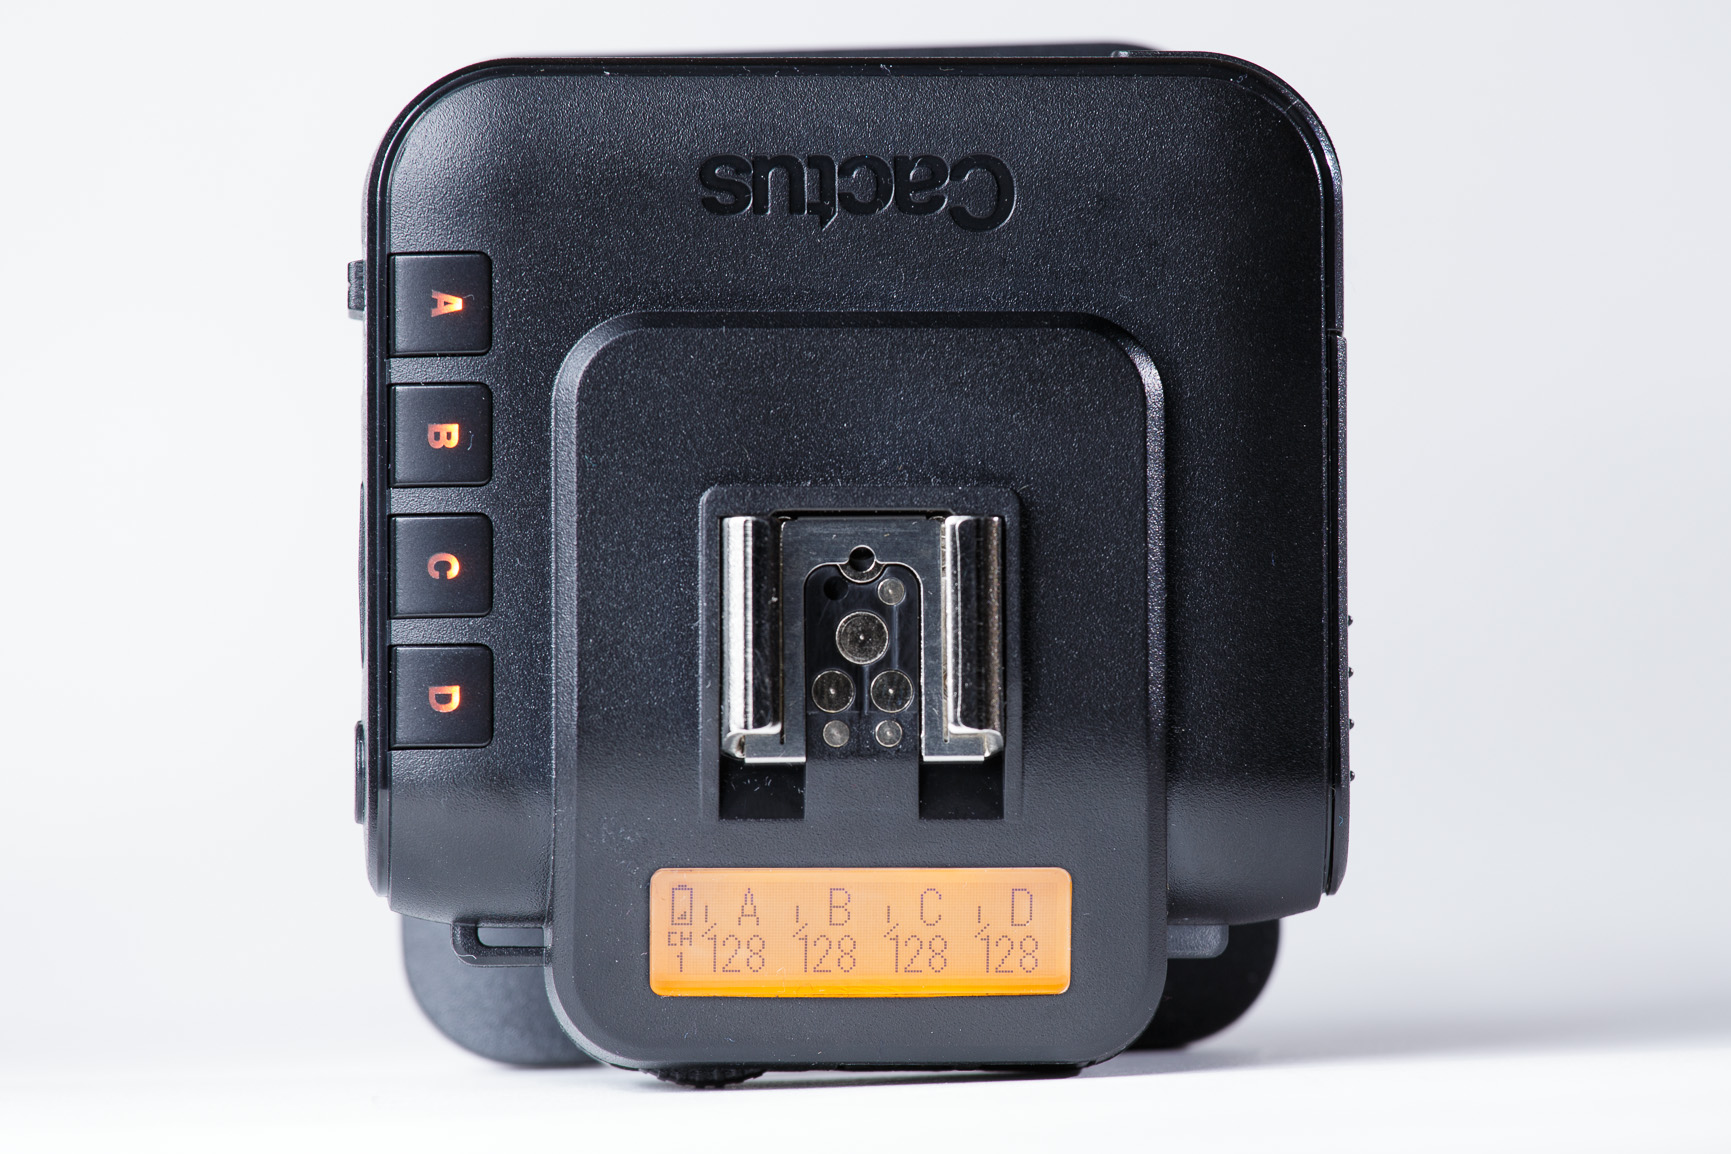
Group buttonsThese buttons (‘A’ through ‘D’) set the group or groups the V6 uses. In TX mode, they select the groups that are controlled by the transmitter. In RX mode, they select the (single) group that the receiver responds to. The illuminated letters are easily visible from most angles, which is very convenient in dark or dim environments. |
 |
LED status indicatorThis led conveys status information, using different colors (orange, green, red). Whenever you press the test button on the TX, the status LED on the TX and all RXs light up (orange for half-press, green-for full press). On an RX, the LED will blink orange whenever a command is received from the TX (power setting, wake-up) and blink green when the RX is triggered. The LED blinks red repeatedly when the batteries are low. |
  |
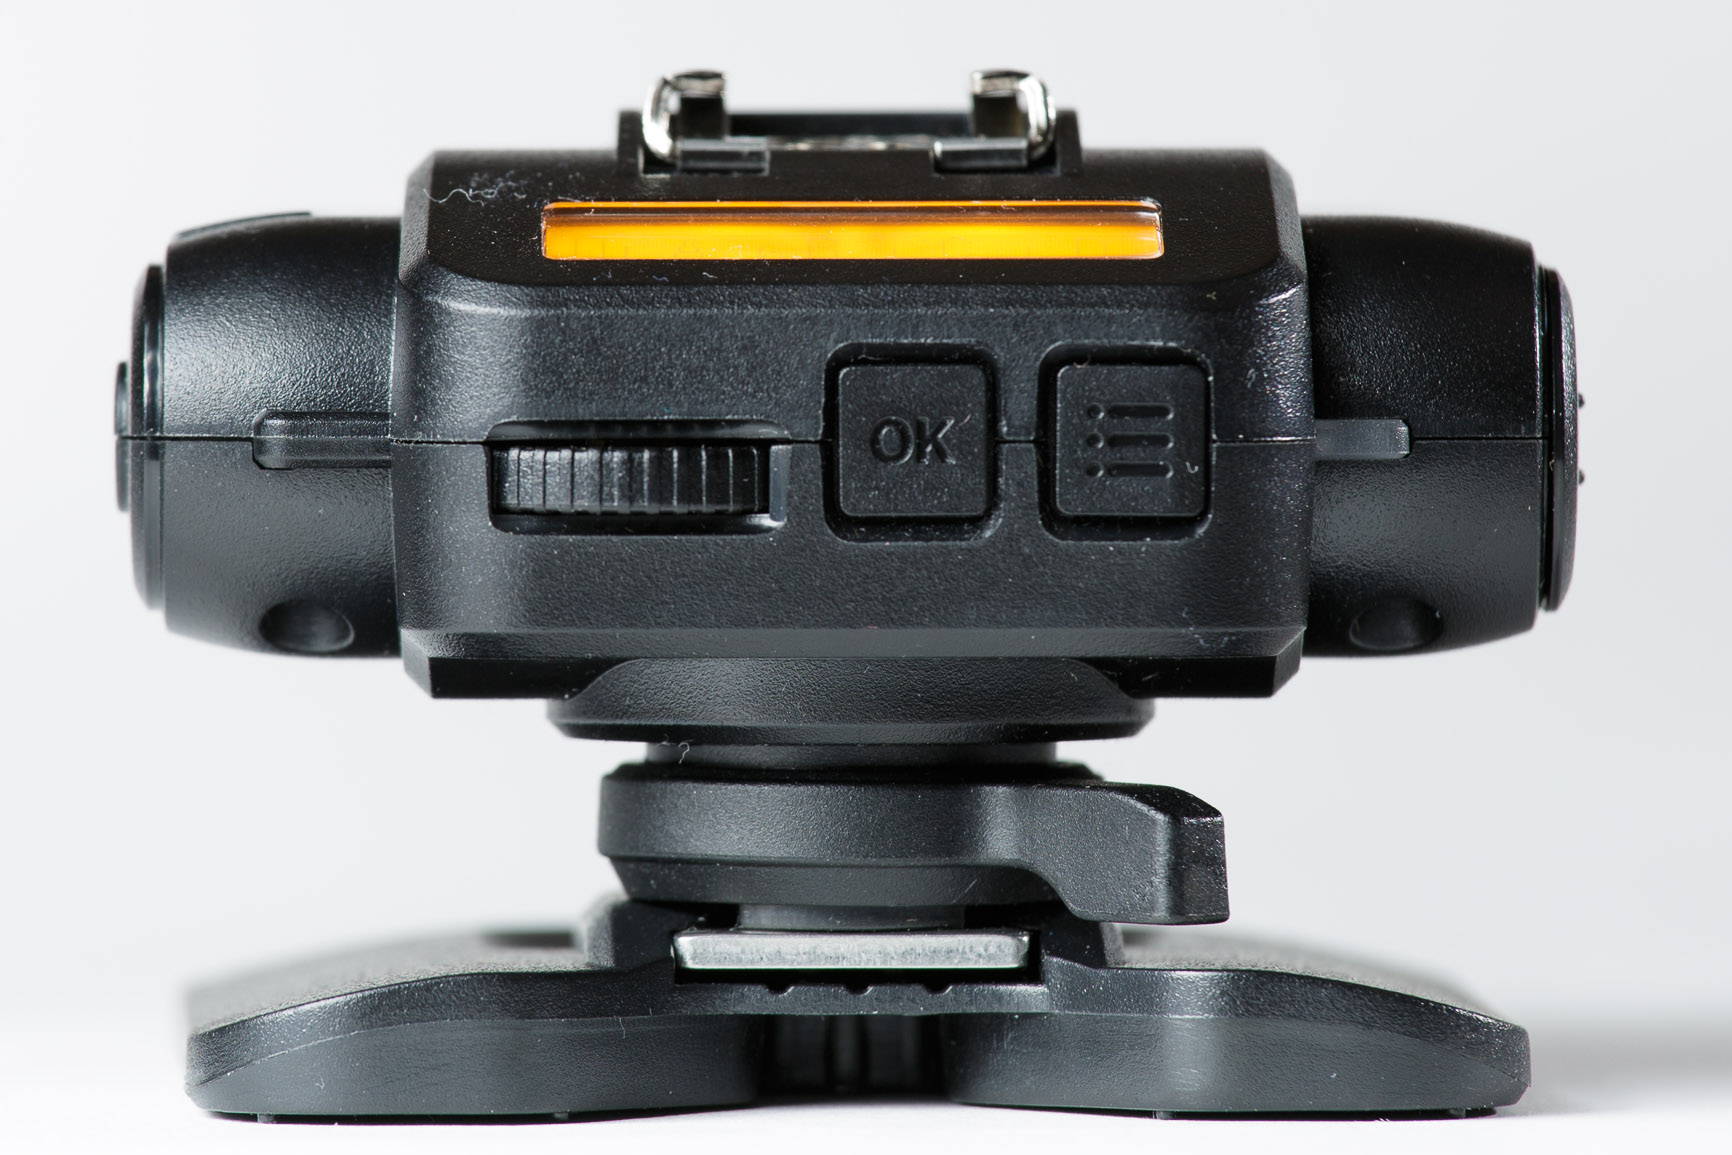
LCD screen and control buttonsMost control of the V6 is done through the LCD screen, using a rotary selection dial, OK button and menu button. The screen’s backlight turns on whenever you press a button. The screen remains legibly even at low angles (top, bottom and sides). Lanyard loopThis small plastic extrusion enables the V6 to be tied to basically anything. Most notably a flash stand or camera when not using the hot shoe. |
Basic operation
The V6 offers quite a few advanced features, from delayed triggering to custom flash profile creation. Since most of the time you’ll “just” be using them to trigger flashes and remotely set their power levels, let’s start there.
This is a really straightforward process, even with the V6 straight out of the box:
- Put a V6 on camera hot shoe, turn mode switch to TX.
- Put a V6 on each flash and turn mode switch to RX. Via the menu, select the correct flash profile for the flash on each RX. Make sure the TX and all RXs are set to the same channel and select the appropriate group (A, B, C or D) for each flash.
- On the TX, set the desired power output for each group, by press-and-holding the group button and turning the selection dial. Power settings can also be adjusted for all groups simultaneously by using the dial without pressing a group button. Adjustments are in 1/1, 1/2, 1/3, or 1/10 stop steps.
- Take photo.
- Check the results and repeat steps 3 and 4 as necessary. Need to single out a group and see how it lights/affects your scene? Just turn of all other groups and take a photo.
It’s that easy. And like with the V5s, I’ve never had a flash misfire. I did forget to set the correct flash profile a few times at first, which can mean that a flash does not fire with the correct output (or at all). But that’s easy to detect and easy to fix. I’ve tried all kinds of combinations of bodies and flashes – Canon 5D mkII/mkIII, Nikon D600/D700, with all my own flashes and several other Nikon flashes (SB-700, SB-800, SB-900). It just works. The only flash I’ve tried that wouldn’t play along was a Sigma EF-500 DG Super for Sigma’s TTL system. Cactus say the Sigma TTL system isn’t supported yet, but may be if there is enough demand. More on compatibility later.
The control buttons on the V6 are well laid-out. The group buttons, the controls below the LCD screen and the test button are all easily reachable with one’s left hand, which is convenient when holding the camera in one’s right hand. The menu is easily navigable given the size of the LCD screen.
A nice addition is what Cactus call the “Quick power adjustment mode”. By pressing the OK button (or pushing the dial) the adjustment step size can be toggled between 1/1 and 1/3 (or 1/2 or 1/10). This allows one to quickly dial in approximate power levels and then fine-tune them.
Here’s a short video to show how to operate the remote power control. Be sure to watch it in HD and full-screen so you can see what happens on the LCD screens. Note how each receiver blinks its status LED when it receives updated settings (group on/off, power level) and how the status LEDs turn orange for half-presses and green for full-presses of the test button. I set the transmitter to Absolute power mode at about 0:58 — more on that later on.
Compatibility
While a number of other flash systems allow one to remotely set power levels (Nikon CLS, TTL, PocketWizard), the beauty of Cactus’ system is that it’s (in essence) brand-agnostic – one can set power levels for flashes of different brands at the same time. It doesn’t matter whether one flash is a Canon 580EXII, the other is a Nikon SB-800, yet another is a YongNuo-for-Pentax or even some ancient model (like my Canon 540EZ) for a now-disused analogue TTL system. The V6 can trigger and control them.
For triggering, the V6 is compatible with “practically all cameras that come with either (1) a standard ISO hot shoe, or (2) a female sync port connection”. However, not all flash systems are supported for remote power control. Sony/Minolta and Panasonic are currently not supported by the V6, as are some third party flash models. The how-and-why of this is a bit technical, but Cactus are working on supporting more flash models and systems in the foreseeable future. (Sony cannot be supported, because their hot shoe is incompatible with the V6’s multi-system hot shoe.) The V6 comes with predefined profiles for quite a few flashes (see the list on Cactus’ website) and new flash profiles will be released through firmware updates.
Moreover, it’s possible to create your own flash profiles, through the built-in learning program. Even though there (currently) is no predefined profile for the Canon 430EZ, I have created my own flash profile for it. (More on profile learning later.) Surprisingly, the V6 can set the 430EZ’s power all the way down to 1/128 in 1/10 stop steps, even though the manual controls on the 430EZ only go down to 1/32, in full stop steps!
Cactus have recently released a flash with a built-in V6 transceiver, the RF60. This manual flash is fully compatible with the V6 and can act as both a master and a slave unit with the V6. The V6 can adjust the RF60’s zoom level remotely. The V6 is backwards compatible with the V5 and with Cactus’ laser trigger LV5, but not their older triggers (V4 and V2).
Here’s a tip on using the V6 with the V5. The V5 doesn’t support groups, which means any V5 receiver set to a specific channel will respond to trigger commands sent by a V6 transmitter, regardless of the active groups on the transmitter. However any V5 receivers set to channel 2, 3, 4 or 5 are triggered by a transmitter set to channel 1 (both V5 or V6). By setting all your V6s (transmitter and receivers) to channel 1, and your different V5 receivers to channels 2 trough 5, you can single out each group of V5s by setting the transmitter to the corresponding channel, since this will only trigger the receivers set to that channel. When you set the transmitter back to channel 1, all V5 receivers (and all V6 receivers in an active group) will fire.
Advanced features
TTL Pass-through

The V6 does not support wireless TTL (i.e. TTL via radio). It does however support TTL pass-through. This means that a V6 attached to a camera hot shoe will transparently pass through TTL commands between the camera and a flash connected to the hot shoe of the V6. Just press-and-hold the menu button for two seconds and you’re good to go. Any V6 can pass through TLL commands for Canon, Nikon, Pentax, Panasonic, Olympus and FujiFilm TTL systems (unlike e.g. the Phottix Strato II, which has different versions for Canon and Nikon).
The TTL pass-through mode lets the V6 integrate seamlessly with my Canon gear, while adding the ability to simultaneously control and trigger additional flashes, even if those don’t support E-TTL. Wireless TTL would have been a nice feature to have for when I’m working outside with a single TTL flash in a softbox (e.g. an Apollo Orb) in sunny weather, where regular TTL can be quite unpredictable. However, I mostly use my flashes for multi-flash studio/strobist setups, where I prefer manual flash anyway. In those setups the V6 saves at lot of walking around adjusting flashes, which keeps the flow of a model shoot going.

Relay mode
With an (optional) shutter release cable, the V6 can be used to trigger the camera. This requires two V6 transceivers:
-

Shutter release Connect the X-sync port of one V6 to the camera’s shutter release port, and set that V6 to RX mode.
- Set the other V6 to TX, check the channel and group, and you’re done.
Half-press the test button on the TX to focus, full-press to release the shutter. Bulb mode is also supported. The TX can also be used to trigger any flashes, but this may result in the flashes firing before the camera shutter is released. One could put a V6 on the camera hot shoe to trigger remote flashes, but that would require another V6. To circumvent this, the V6 offers what Cactus call a “Relay mode”.
In Relay mode, the V6 used to trigger the camera is used to also trigger the flashes. For this one connects the V6 RX used to trigger the shutter not only to the camera shutter release, but also to the camera hot shoe. The process then is this:

- The V6 TX (let’s call it the handheld V6) triggers the V6 RX on the camera (the on-camera V6)
- The on-camera V6 triggers the camera through the shutter release cable.
- The camera releases its shutter and triggers the on-camera V6 through the hot shoe.
- The on-camera V6 triggers the flashes.
What’s really nice about this is that one can set the flash power levels from the handheld V6 – including a flash that’s attached to the on-camera V6. TTL passthrough is not available in Relay mode.
Optical triggering
The V6’s built-in light sensor enables it to be used as an optical trigger rather than a radio trigger. It can trigger on the first flash it “sees”, or on the main flash.
Delay
The V6 is equipped with a delay timer, which allows the V6 to delay its trigger response in both TX and RX modes. Delays can be set from 1ms 9999ms, by setting the desired amount of milliseconds in the menu. This provides some creative options, for example by having flashes fire in sequence. Or by waiting just a few milliseconds after a water balloon has fallen past an LV5 laser trigger — or hit a piezo sensor, as I used for the photo to the right. In combination with optical triggering it’s also useful when using high-speed sync flash.

Lo power
The V6 can control most flashes down to 1/128 power. Some flashes (mainly types that use a form of analogue TTL control rather than digital commands) can even be set to an even lower setting, which Cactus call “Lo power”. This setting corresponds to somewhere between 1/128 and 1/256 power, depending on the flash used, and does (surprisingly) produce a flash output noticeably lower than 1/128 on the flashes I’ve tested.
Absolute power mode
The V6 can use the guide number (GN, maximum power output) stored in each flash profile to calculate the absolute power output in EV (exposure value, 1EV is one stop) of each flash in a setup. This enables it to provide an alternate way of setting power levels, called Absolute power mode, as opposed to Relative power mode (the default mode of operation).
In Relative power mode, group power levels are set to relative values such as 1/128, 1/32 etc. When a group is set to (say) 1/32, all flashes in that group fire at 1/32 of their full output, regardless of GN. So flashes with different GNs will produce different amounts of light.
In Absolute power mode, group power levels are set in EV such as 11EV or 16EV (or even 12.1EV). When a group is set to (say) 11EV, all flashes in that group will fire at a power setting that will produce 11EV of light. So each flash in a group produces the same amount of light. This is achieved by letting flashes with different GNs fire at different relative powers.
The benefit of this is abstraction from the flashes that are used; it doesn’t matter if a certain light source is a GN 43 or a GN 56 flash, as long as it is able to produce (say) 12EV of light. So for someone like me, with lots of different flashes, absolute power mode can make life easier, once you get used to thinking in EV rather than fractions. The system even allows one to make temporary or permanent adjustments to flash profiles (both custom and predefined) to accommodate for aging flash tubes, lighting modifiers etc. Pretty sophisticated.
Creating flash profiles

For flashes that support Analogue TTL, the V6 can create custom flash profiles. Put the flash onto a V6’s hot shoe, point it at a matte white surface (a wall or a bed-sheet should do), start the built-in learning program and follow the instructions on the V6 LCD. The V6 wil perform a quick test to see if the flash can be controlled, and then ask to manually set the flash to 1/2 power, 1/4 power etc., firing a few test flashes at each power setting. Once the V6 is done learning and calibrating, the custom profile can be stored and named and then copied to other V6s.
This process worked really well for the flashes I’ve tried, which were mostly flashes for which profiles already existed. Any profile I created worked just as well as the predefined profiles for the same flash. I didn’t perform any quantitative test, but when switching back and forth between my own and the predefined profiles, I didn’t notice any significant differences in power output.
When learning profiles, make sure to put fully charged batteries in the flash though, because otherwise the flash may take too long to recycle between test firings and the learning program will time-out, especially at 1/2 power.
During firmware updates, custom profiles are erased from the V6, so be sure to copy your profiles to V6s you’ve updated before updating the last V6. Update: As of firmware version 1.0.152, custom flash profiles are preserved during firmware updates.
Firmware update
Updating the V6’s firmware is quite easy. Download Cactus’ firmware updater software from their website and start it. Remove the batteries from the V6 and connect it to your Windows computer with a mini USB cable (not supplied), and switch it on while pressing the menu + test buttons. The updater will show to which firmware version it will upgrade the unit (you can have it check for new versions online). Press the update button and wait until the program says the V6 can be disconnected.
Measurements
Power levels
Class A’s review on pentaxforums.com provides some interesting measurements on power levels. He states that power output with his 540EZ flash are within 0.15EV of the set value throughout the flash’s entire range (1/128 through 1/1) with the predefined profile, and within 0.2EV for all but the extreme power settings with his custom profile for that flash. That’s about as accurate as manually setting power levels. Quite impressive, especially with such an old flash gun.
Distances
The maximum operating distance of the V6 is quoted by Cactus as 100m, but I’ve done a quick test and had no problems controlling a V6 at nearly 200m. (And other beta testers have reported even longer distances.) For situations where the receivers are very close to the transmitter (i.e. closer than about 20cm, for macro shots and the like) the V6 offers a short range mode that can be set via the menu (firmware versions 1.0.152 and up).
Conclusion
All in all I’m really impressed with the V6. It’s a solid performer that works seamlessly with a wide range of camera bodies, flashes and triggers — most importantly my own gear. Remote power control is straightforward and reliable. Triggering is rock-solid; I haven’t had a single misfire during weeks of use. The fact that the V6 is a transceiver and thus any V6 can be used as either a transmitter or a receiver (as opposed to for instance the Phottix Strato II system that has separate transmitters and receivers) adds real flexibility to the system. Additional features like TTL pass-through, relay mode and delay make the system even more versatile. And for Cactus V5 owners, the fact that the V6 is fully backwards compatible with the V5 is a nice extra.
At this price point (just shy of $55 from Gadget Infinity at the time of writing update 07/2015: $70 from their newly-launched store), I can’t think of any system that offers this level of remote power control. There are some systems that offer wireless TTL, but those are all brand specific, and most are at least twice as expensive.
Pros & cons
Pros
- Reliable triggering, even over long distances
- Remote manual power control, with four groups
- Brand-agnostic; controls many brands and types of flashes at the same time
- Profile learning; create custom profiles for ‘unsupported’ flashes
- Competitively priced
- Transceiver: any unit can be the master, which adds flexibility
- Intuitive interface (although you should read the manual to unlock all features)
- Good build quality
- TTL pass-through, Relay mode, Absolute power mode, delay timer, remote zoom control
- Firmware upgradeable
- The RF60 is a very good, fully compatible manual flash
- Backwards compatible with V5 and LV5
- Fixes nearly all ‘flaws’ of the V5 (locking wheel, channel setting, power save)
Cons
- Units are a bit large in the camera bag
- Mounting thread may be a bit close to hot shoe
- No sync / shutter release cables included (but you probably already own those)
- No wireless TTL, only TTL pass-through on transmitter
Verdict
As said, I’m impressed. The V6 is reliable, easy to use, and very versatile – the pros and cons speak for themselves. If you’re looking for brand-specific TTL, look elsewhere. If you’re looking for a wireless flash system that offers accurate, reliable remote control over a wide range of flashes from many brands and eras (even the film era), the V6 should definitely be somewhere at the top of your list.
All images and videos in this post were made by me, except the black-and-white schematics, which are from the V6 manual. Do not use these images nor any parts of this post without my prior consent.
Thanks for your help and honesty. I shall be purchasing 4 of these
Hello Peter!
I enjoyed your review of the V6, only missed the AF-assist beam for shooting in dark places in V6. For me it was not clear so the flash engaged in V6 on the camera will have all the features of the E-TTL, and when you talk about HSS, cites as maximum shutter speed of 1/1000 according to the camera’s ability, this means in the case of Canon 5D MK III I can shoot with greater than 1/1000 speeds?
Thanks for listening!
Hugs!
Michel
Hi Michel, thanks for your feedback and questions. When you put the V6 in TTL pass-through mode, the flash on the V6 will have all E-TTL II features, including focus assist, zoom and HSS at 1/8000 shutter speed (tested on 5D mkIII with 580EXII and 600EX-RT). The stated maximum sync speed of 1/1000 is for regular flash (without HSS), so the V6 is faster than the 5D mkIII’s 1/200 max sync speed. Please do note that the V6 doesn’t provide HSS-via-radio; for HSS on off-camera flashes you need to use the built-in optical trigger and delay timer. (HSS requires full TTL support, which the V6 only does in TTL pass-through.)
Hello, i’m wondering how to do the HSS on v6, or how can i get the speed of 1/1000th?. I own multiple v6 and one SB-900, the max speed i can get from v6 is 1/250th. Please help
“Note: I’ve enabled HSS on my dslr already, I can go on any speed on CLS.
The V6 doesn’t do HSS-via-radio (see my comment above from 12 May 2014). The stated maximum sync speed of 1/1000 is for regular flash (without HSS), that’s why you can’t go higher than 1/250 (which is the max sync speed for most Nikons).
The way to use HSS with the V6 (and the RF60) is to use its optical trigger and delay timer. HSS uses a pre-flash to start HSS exposure. The V6 can pick this up with its optical sensor and send a trigger signal via radio. By using the delay timer (on either the transmitter or receiver), you can have the flash trigger at the right time. The exact delay depends on the aperture value, as stated in the RF60 manual, chapter 11.2.
You have to have a TTL flash on your camera, set to HSS (I’m not sure if the built-in flash can do HSS) to optically trigger the V6. The flash you’re triggering must allow enabling HSS mode without a body connected (the RF60 has a “HSS sympathy” mode, which allows this, as do several other third-party flashes).
Alternatively, you can use this approach by Brian Hursey.
Hi Peter,
Great review of the Cactus V6 – thank you!
I used my newly-acquired set of V6s for the first time for a wedding last night (two Cactus RF60 and two Canon 580 EX II off-camera on lightstands, and V6s in TX mode on my Canon 5D mk3 and Fuji X-E2), and I have discovered one “gotcha” that you may like to know about!
My aim was to be able to use different power settings on each transmitter, so that I could use different apertures on my lenses – for example F5.6 on the Fuji with a wide-angle lens for an overall view of the couple’s first dance, and an 85mm at F1.8 on my Canon for shallow DOF close-ups of the couple.
The problem that I had was that when I switched cameras, the flashguns remembered the power setting that was last used on the other camera, so I was getting underexposure when going from the Canon to the Fuji, and overexposure changing from Fuji to Canon. I could not figure out what was happening at the time, so was constantly adjusting my ISO and aperture to compensate.
Anyway I did some testing this morning and discovered the reason. If you have two transmitters set to the same radio channel, controlling the same off-camera flashgun(s), the off-camera V6s or RF-60s will remember the last power setting used. What you have to do if you want to use a second transmitter that has a different power level, is to flick the control wheel one step to left or right and back again, to send an update to the off-camera receivers. Then they stat working at the correct power for that camera’s setup.
So it seems that the Cactus V6 does not send a power setting command each time you take a picture, only when you make a change with the control dial on the V6 in TX mode.
I will ask Cactus if maybe they can update this in firmware – it’s OK now I know how to fix the problem, but it slows me down a little if I have to reach up to the transmitter and reset the power each time I switch cameras!
Hope that info is useful to somebody.
Hi Chris, the V6 indeed does not send power levels as part of the trigger command. I think that is mostly because that would introduce a delay in triggering (since they’d first have to send power levels for up to four groups and only then be able to send a trigger command).
Your workaround of turning the control dial will do the trick, as would turning each V6 off and on. Cactus are always looking to improve the V6, so you could post your suggestion to their support forum at http://cactus-image.com/community/. They may be able to incorporate something for this into a new firmware for the V6.
Thanks for the great review.
To be clear: if I already have V5’s for my flashes, I can use the V6 on camera to control the power of the flashes with the V5’s attached? So I do not need multiple V6’s if I already have the V5’s?
Cheers,
Niek.
Hi Niek, the V5 has no way of controlling the power output of a flash, that’s new with the V6. So a V6 on-camera is not enough, each flash needs a V6 if you want to remotely control flash power. The V5 also doesn’t understand groups; a V5 set to the same channel as a V6 will always fire, no matter what groups you’ve selected — but see my tip in the chapter Compatibility on using channels for this.
The V6 can’t make a V5 exceed its technical limitations, but it is fully backwards compatible with it. So you could first get two V6s (or a V6 and an RF60) and see if you like the system before upgrading all your V5s.
Heeft u ook een nl versie ? Ik heb een Canon 70D, een Cactus V6 duo en een Metz mecablitz 48AF-1 digital. Ik heb geen kabeltje, zat ook niet in het doosje. De flits en Cactus staan op statief op RX, Canon en Cactus op FX, allebei zelfde kanaal en toch wil de flits niet flitsen. Bij een duw op de testknop van de Cactus /flits, flitst de flitser. Als ik afdruk op het fototoestel, niks. Ik weet niet wat er verkeerd is. Graag uw deskundig advies. Dank u
Heb je de Metz 48AF-1 voor Canon? Die staat niet tussen de lijst met ondersteunde flitsers op de site van Cactus. Als ik het mij goed herinner, is de 58AF-1 de ‘grote broer’ ervan (die wel ondersteund wordt), dus mogelijk werkt je flitser met dat profiel wel.
Heb je op de Cactus waar je je flitser op hebt gezet wel het juiste flitserprofiel gekozen? Zie hoofdstuk 10.1 van de handleiding. Het profiel voor de 58AF-1 zou moeten werken, denk ik. Mocht dat niet werken, dan zou een kabeltje wel moeten werken (die levert Cactus niet standaard bij de V6), maar dan kun je het vermogen van de flitser niet meer instellen.
Voor meer vragen en antwoorden kun je ook terecht op het support forum van Cactus.
Ik gebruik jullie wireless Flash trigger V4. Ben al aan mijn derde setje bezig in 4 jaar tijd. Klopt het dat de zenders maar ongeveer een jaar meegaat? Dat is mijn ervaring. Ik ben er altijd heel voorzichtig en zuinig op. En toch scheien ze er na ongeveer een jaar mee uit. Is dat normaal of kan ik ze op een of andere manier weer aan de praat krijgen? Graag uw antwoord
Dag Veronica. Allereerst: ik werk niet voor Cactus, ik heb alleen de V6 voor ze getest en deze review geschreven. Ik heb persoonlijk geen ervaring met de V4, alleen met de V5 en V6. Ik heb op diverse plekken gelezen dat de V4 minder betrouwbaar is dan de V5 (de V4 triggert niet altijd, dat probleem heb ik met de V5 nooit gehad), maar ze zouden langer dan een jaar mee mogen gaan. Je kunt Cactus eens aanschrijven over je problemen, ze zijn doorgaans heel klantvriendelijk. De V5 beviel mij trouwens erg goed, dus als je je flitsers niet op afstand in hoeft te kunnen stellen, zou ik die serieus overwegen. Of eventueel een ander merk, mogelijk heb je daar meer geluk mee. Succes!
Hi Peter,
I own a few Cactus V5 transmitters and if I use my Nikon speedlight on it (that has a lock to secure it in place), instead of my Yongnuos (that screws on), it falls off my camera all the time.
I’m wondering if the V6 model was changed to accomodate the locking mechanism on some flashes. Based on your review, it seems that they did, but if you could please just confirm it for me, I’d appreciate it.
Thank you so much.
Hi Lucia, the V6 does indeed accommodate a locking pin (i.e. it has a hole in the hot shoe). I have had a Nikon flash (a SB700 I believe) fall off a V5 once, but have not had the same happen with the V6. But do make sure that the locking pin is securely in the hole when putting the flash on, because not every flash fits equally tight.
Is it normal that the v6 is very tight fit on camera fujifilm hot shu x100t does it matter it’s a bit hard to put on
Hi Mike, I don’t have any Fuji equipment, so I can’t test it myself, but the fit shouldn’t be so tight that you can’t put the V6 on the hot shoe. The V6 does have a locking lever around its hot shoe, that should be to the left before you put it on the camera; it locks to the right (as in this image)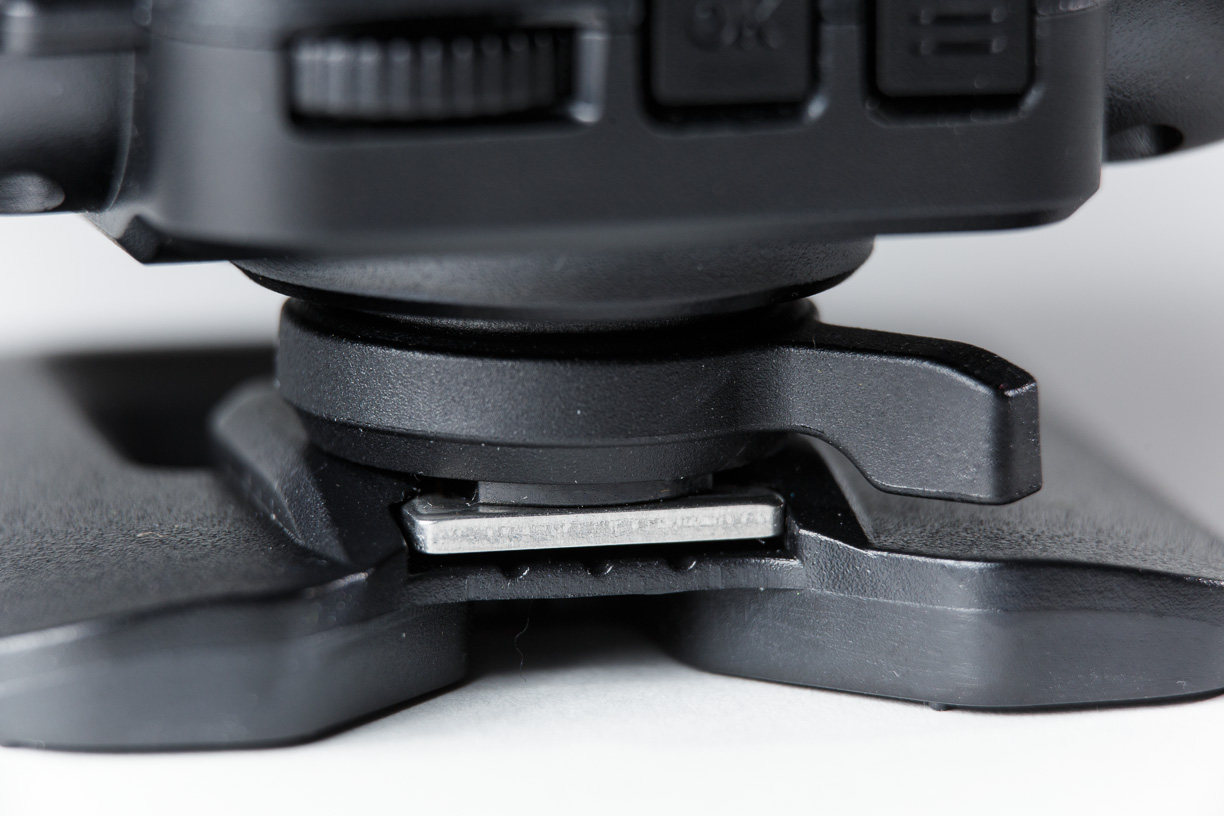 .
.
If you’re still having problems, please ask Cactus themselves on their Community: Cactus Community
Thank you